We’ve been intrigued by Slacks’ open source secure mesh software ‘Nebula’ for a while, and finally got some time to see if our clients could benefit from an implementation.
In short, the answer is yes. **note this article became too big so deployment will be next, but this will get you running
Goals
It solves a lot of problems and moves us ever closer to ‘zero trust’
What problems?
Secure information transport between nodes without needing a VPN, or even a gateway to ‘own’ connections.
Makes things simpler for clients
Allows security groups that can’t connect to each other, while simultaneously existing in the same network
Creates a network that’s always available, and yet non- routable for nodes on the public internet
And finally- we’ve discovered some performance issues with Unifi Dream Machine Pro doing L2TP VPN. Several clients have these devices and they are fully capable of filling a 1gbps pipe all day.
But apparently they can’t handle the VPN throughput required when everyone is working from home.
*Lots of this material is not original. The only thing we’ve done is attempt to translate the instructions for creating a Nebula network into a bigger network where some clients aren’t allowed to chat to other clients, mostly based off the notes kindly written up by Nate. We’ve liberally copied and pasted from these sources, please contact us via the form on this website if we’ve missed attribution or if you want it…
Much thanks goes to all of those who’ve written before, reference links are below
https://github.com/slackhq/nebula
https://aaron.vansledright.com/slacks-new-nebula-network-overlay/
https://arstechnica.com/gadgets/2019/12/how-to-set-up-your-own-nebula-mesh-vpn-step-by-step/
Create a Virtual Machine and log in
I used a $7.50/ month VM at Binary Lane, you could use Linode, Azure, Google Cloud, AWS etc.
Do this > create VM, get public IP, install operating system (I used Ubuntu 20.04 LTS)
run updates and upgrades
log in as root
Create the Lighthouse
The repo is at
https://github.com/slackhq/nebula/releases
Make a directory to store your configs, we’re going to store it in /opt
mkdir /opt/nebula
Change into that directory
cd /opt/nebula
Download the software
curl -LJO http://github.com/slackhq/nebula/releases/download/v1.4.0/nebula-linux-amd64.tar.gz
Unpack the software
tar -xvzf nebula-linux-amd64.tar.gz
Create certs
./nebula-cert ca -name "Your Company"
(From the docs) This will create files named ca.key and ca.cert in the current directory. The ca.key file is the most sensitive file you’ll create, because it is the key used to sign the certificates for individual nebula nodes/hosts. Please store this file somewhere safe, preferably with strong encryption. HINT- once created, move your ca.key off that lighthouse!
But we need to go further than this…
Create Certs for each logical network
However, we’re going to specify the output file names so we don’t mix them up-
nebula-cert ca -name infrastructure -out-crt infrastructure.crt -out-key infrastructure.key

nebula-cert ca -name servicemax -out-crt servicemax.crt -out-key servicemax.key

nebula-cert ca -name spare -out-crt spare.crt -out-key spare.key

nebula-cert ca -name client1 -out-crt client1.crt -out-key client1.key...
nebula-cert ca -name client99 -out-crt client99.crt -out-key client99.key
(You can get around this by going to System Preferences/ Security & Privacy/ General and clicking ‘Allow’ if you do this within 30 minutes, because it does actually remember taunting you by deleting your file…)
Combine CA Certs Together
cat infrastructure.crt servicemax.crt spare.crt client1.crt > ca.crt
Creating Lighthouse node certificate
We want to create a node cert for our Lighthouse-
Here’s something that took me ages to figure out. I was trying to be too literal with the instructions, and attempting to build my nodes from the ‘master’ after I had cat’d all the certs together. This is incorrect- you need to sign your nodes using the CA that you created above in ‘each logical network’. So if you’ve got a folder for ‘client1’ that contains ‘client1.crt’ and ‘client1.key’ you need to navigate to the ‘client1’ folder to create and sign your node certs. Then you need to add the allowed groups in the config.yml
– In a Slack conversation with Nate, he realised we can’t segment these networks by subnetting for now, this ability may re appear in the future
./nebula-cert sign -name "nebula" -ip "10.0.0.1/16"and a node cert for our test machine
./nebula-cert sign -name "localtest" -ip "10.0.0.100/16"Testing
*Next you should quickly run up a config.yml file for both Lighthouse and test client, sign a cert to add them to the same group, start up the process and test it. All good?
Don’t go past this point, configure everything and THEN discover something is wrong…
Sign Certs for each node
nebula-cert sign -ca-crt client1.crt -ca-key client1.key -name ‘MyNode.client1' -ip ’10.0.0.1/16' -out-crt MyNode.crt -out-key MyNode.key
Modify Config.yml for Lighthouse
If not, wait until I clean it up…
Lighthouse can talk to everyone, but you only need inbound and outbound UDP:4242 for it to work, anything else is just tinsel and glitter
Add all groups to Lighthouse setup, specify port number for extra services
– port: 2222
proto: any
groups: infrastructure
Out- Add all groups, don’t specify port number
Then we need to edit the config.yml file that controls access. Get a copy from Github and edit it according to your needs.
Modify Config.yml for Nodes
Infrastructure Permissions
Our infrastructure nodes need to be able to connect to each other. This effectively means a different firewall setup for each set of infra, or should we create new groups for each set of infra?
In- (necessary ports)
Out- (restrict or don’t restrict?)
Infrastructure group stands on it’s own, but Servicemax Admins are added to the Infrastructure group
Client Permissions
Client nodes need to be able to talk to some other nodes on the same network, but not others. Think of this as a client / server setup- Frank needs to connect to the Server, but Frank does not need to connect to Sally’s computer. thanks for ruining the formatting WordPress
# example for Server running AFP
Inbound:
– port: 548
proto: any
groups:
– client1
– servicemax
– infrastructure
# example for Server running SMB
Inbound:
– port: 445
proto: any
groups:
– client1
# example for Server running Connectwise Control
Inbound:
– port: 8443
proto: any
groups:
– client1
– client2
– servicemax
– infrastructure
Server port AFP:548, SMB:445. Client CWC:8040,8041, 8443
Out- All (to restrict later?)
Client nodes need to connect to Services on the Infrastructure nodes, but not to the admin interfaces. Eg. WordPress running on a Kubernetes cluster- how to do this? We could set up a WordPress site that is available only to Clients or only to certain clients by using these groups. This might require running WordPress Multisite or Subdomains? Probably better to have it available to Clients, then restrict pages by logins- and we can do logins with SSO later. Not everything is a layer 3/4 problem, right?
According to Ryan Huber in this video, you can set groups by simply specifying a name like in this screenshot from a 2019 video-
Link to the full video-
Firewall & Permissions
OK, the assertion above about simply setting groups by assigning names is false!
I made some key misunderstandings here. In ‘normal’ networking, if you want to segregate network devices you just put them on a different LAN or VLAN. And you can see from the plans above, that was the method I was going to use to keep the clients devices from contacting other devices on other networks. But in Nebula, that thinking is back-to-front. What we actually need to do is create a big network where every device can talk to others, but restrict the communication via groups.
You have to set the groups when you sign the node config, and these cannot be changed afterwards.
Other settings that appear in the config.yml are changeable. This also led to the next ah-ha moment- the permissions are set in a kind of ‘reverse’ manner.
In a traditional setup- you’d give ULTIMATE POWA to the ‘Admin’ group and less permissions to the other groups. With Nebula, it really is all about group membership. So if you want someone in the Admin group to also have access to the Cleint1 group, they have to be a member of both groups.
Going from the documentation here- (warning- I’m not sure these example work yet!)
https://www.defined.net/nebula/config/
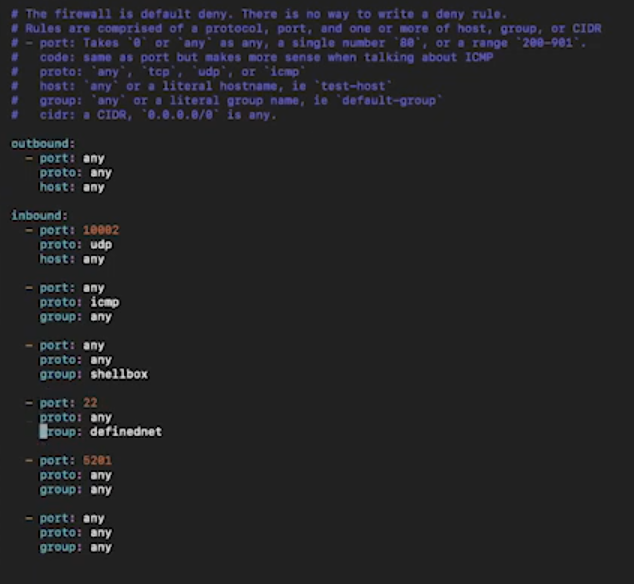
You have a firewall setup that looks like this-
# Nebula security group configuration
firewall:
  conntrack:
    tcp_timeout: 12m
    udp_timeout: 3m
    default_timeout: 10m
    max_connections: 100000

  outbound:
    # Allow all outbound traffic from this node
    - port: any
      proto: any
      host: any

  inbound:
    # Allow icmp between any nebula hosts
    - port: any
      proto: icmp
      host: any

    # Allow tcp/443 from any host with BOTH laptop and home group
    - port: 443
      proto: tcp
      groups:
        - laptop
        - home
So we should set up our security groups before deployment, but looks like we might be able to add some stuff later.
We can see the rules from top to bottom
– allow any outbound traffic, no restrictions
– allow icmp ping packets from anywhere (in reality this is restricted to nebula hosts unless you have any unsafe routes configured)
– allow tcp/443 but restrict to the named groups, ie. ‘laptop’ and ‘home’
Next we need to configure the config.yml file that is supplied on the Gihthub repo. We won’t go through every single detail here, but just specify the options we’ll be using
We need to-
– update the locations of the cert files
– add the public IP of the Lighthouse Node
– change am_lighthouse to ‘true’ for the lighthouse
– uncomment and add IP of Lighthouse node for clients
– make sure ‘punch_back’ and ‘punchy’ are both set to true
– add firewall rules, these will be different for each subnet
ok, check that you’ve got the correct bits in each machine’s directory, correct config files, let’s launch it.
./nebula -config /path/to/config.yaml
Next Article- Deployment