7 November 2020- Updated to include Portainer 2.0
21 September 2021- updated to use new variables for DNS
This is a pretty long article so here’s a list of contents-
- Installing Portainer
- Start Your Portainer
- Set up MACVLAN Network for Pi-Hole
- Create Pi-Hole container
- Upgrading Pi-Hole
- Upgrading Portainer
- Docker communications issues?
The post with a similar title called ‘the easy way’ is far and away the most popular post on this entire site, but I’ve been wanting to improve it for ages. As stated in the notes to that post there’s a few problems with the data it generates and I really thought it could be made better.
If you just want to get your Pi-Hole running quickly, go here-
https://servicemax.com.au/tips/pi-hole-v4-on-synology-in-docker-the-easy-way/
So here it is- the best way to deploy Pi-Hole on Synology in Docker! (Notice it doesn’t say easy? I made it as easy as possible, but it’s still a lot of steps, however once done it will (probably) last forever and make your life immeasurably better, and get you a supermodel girlfriend. Perhaps…
Using this method has the following advantages-
- Much better control over the environment because we’re using the highly configurable ‘Portainer’ for admin
- Give the Pi-Hole it’s own IP address which bypasses any port conflicts with Synology
- No port conflicts means the data is accurate for all devices, not just a summary
- Allows us to keep the configs seperate, making upgrading easier
- Upgrading is only a few clicks
- Have verified it upgrades from Pi-Hole v4.4 to 5.0 with no issues
Installing Portainer
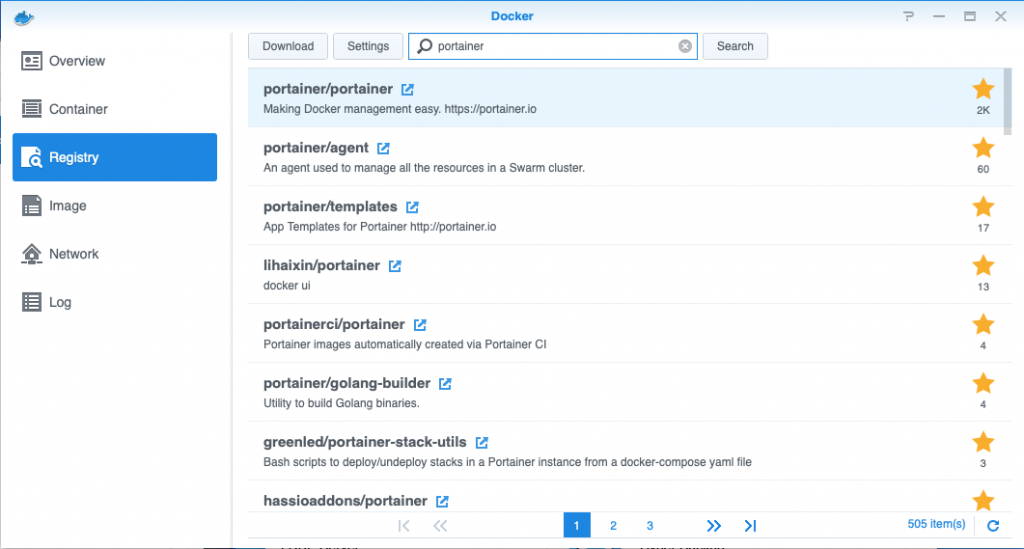
Open Docker, go to Registry, download latest Portainer docker
While this is downloading, let’s do some housekeeping. Go to file station, if you’ve used Docker before you probably already have a Docker folder, if not make it.
Make a new folder in Docker/Portainer
Go to ‘properties’ on your folder to get the correct path, mine is
/volume1/docker/Portainer
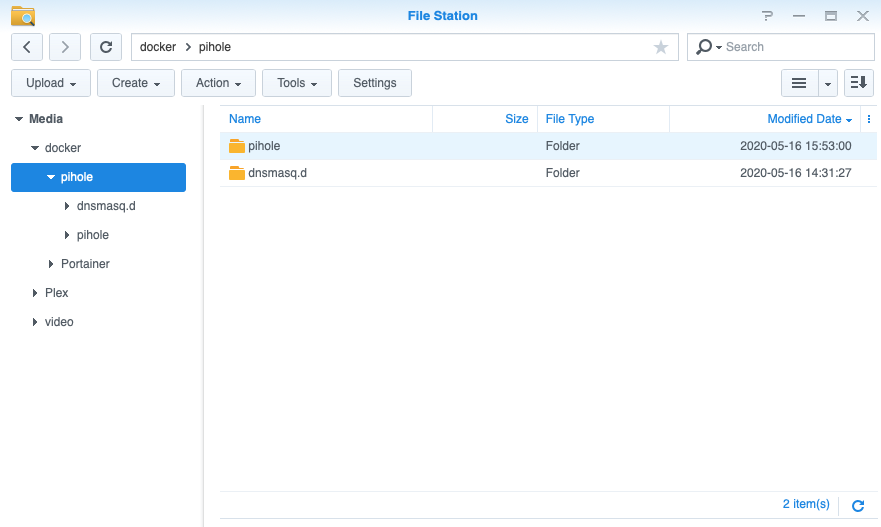
Then go and make another new folder (for later) called ‘pihole’ which should be at
/volume1/docker/pihole/
And a couple of folders loose inside /Docker (again, for later) –
/volume1/docker/pihole/dnsmasq.d
/volume1/docker/pihole/pihole
Your folder structure will look like this-
Turn on SSH
NOTE- This next section had a bunch of stuff about installing Synology Community sources and an app called GateOne. I thought it was useful for people who hate the command line. But soon after this article went live, the Synology Community website went down. After a few people asked me about it and I realised that adding a new package source then GateOne all to avoid using an actual terminal was a bit silly, so I’ve removed it
Go to Control Panel / Terminal & SNMP and turn SSH on under ‘Terminal’ and click ‘Apply’
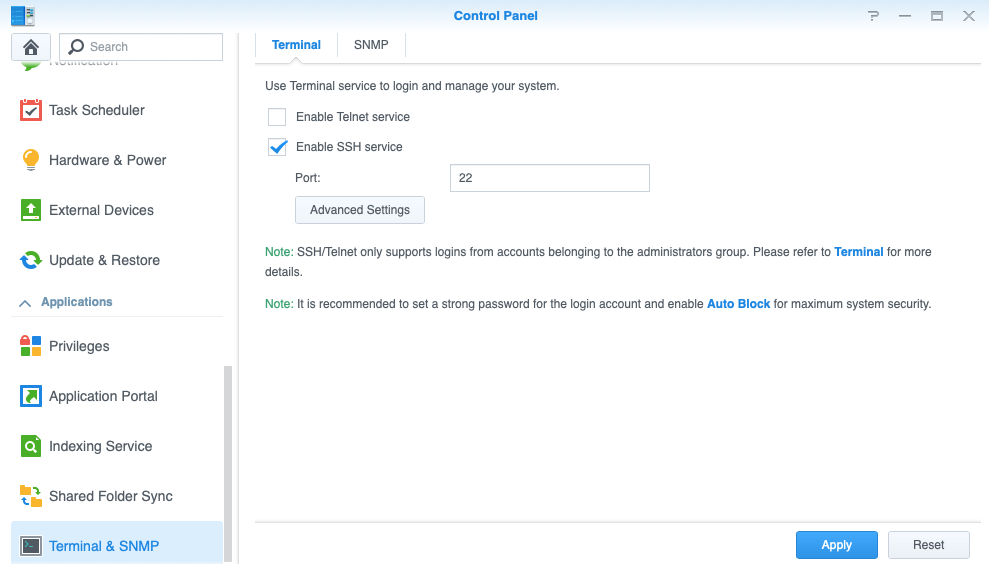
(Remember to turn off later- but not yet)
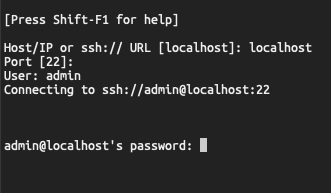
Now on your computer, open an SSH client and SSH into your Synology device as a privileged user. You’ll probably get an error message about inability to chdir, ignore it. Then make yourself root by issuing this command (in bold)-
admin@localhost:/$ sudo su -
Start your Portainer
Check that you have all of your variables set correctly and paste the one line command into SSH
Full command for mine is
docker run -d -p 8000:8000 -p 9000:9000 --name=portainer --restart=always -v /var/run/docker.sock:/var/run/docker.sock -v /volume1/docker/Portainer:/data portainer/portainer-ce
Did you get a permissions error? You forgot to sudo didn’t you…
NOW- before you exit SSH, execute this command
ifconfig |grep eth
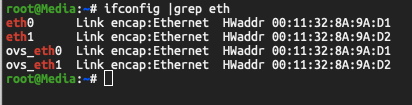
IMPORTANT- This will list all of your physical ethernet interfaces, I am choosing one called ovs_eth1 because I also have a part of a VM cluster on this NAS- but save the interface name- it could be also called eth0 or eth1 if you aren’t running Open VSwitch (automatically enabled when you set up Virtual Machine Manager)
Also thanks to random internet person who told me he had trouble doing this because his ethernet interfaces are bonded, he had to use bond0 to get the rest to work…
Did you get an error message that says ‘Could not create MacVLAN …’?
You will probably need to use one of the virtual interfaces rather than straight eth0 or eth1
Update 4.9.2020 from Chris via the internet- he reports that he was able to use a bonded interface by using ovs_bond0
– He says that he used to run a VM cluster (that’s the reason for the ovs bit) but no longer does. However he kept the bonded connection, and so that interface description works which is in line with our expectations…
ovs_eth1 Link encap:Ethernet HWaddr 00:11:32:XX:XX:XX
(You can turn SSH off now)
Next we log into Portainer
http://IP_OF_YOUR_NAS:9000

Set the admin password, hit ‘Create User’ and log in
Set up the MACVLAN network for the Pi-Hole
You’ll be managing the Local Environment
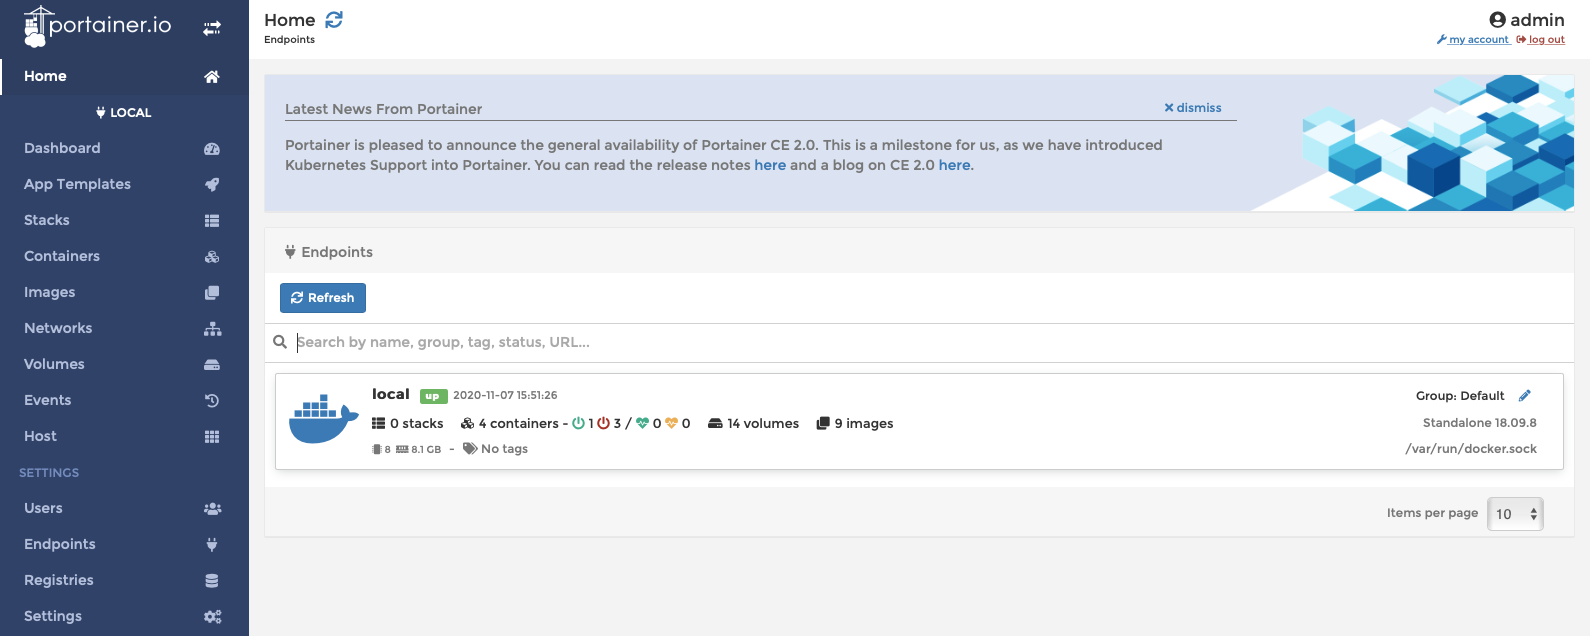
After you click ‘Local’ you’ll see a list of Docker resources, this probably only has one entry called ‘Local’ – click this, then click ‘Networks’ and add a new network called
Pi-HoleNetwork.config
Under Driver select ‘macvlan‘ from the pop up list, this will expose 2 option- ‘Configuration‘ and ‘Creation‘. We have to do both, but first choose ‘Configuration‘ and we’ll use the following settings here
Parent Network Card = this is the one we chose earlier, so I’ll put ovs_eth1
Subnet = the entire local subnet, so mine will be 192.168.0.0/24
Gateway = is usually your router 192.168.0.1
IP Range = I only want to use a single IP so I’ll put 192.168.0.240/32
Excluded IPs = not going to put anything in here
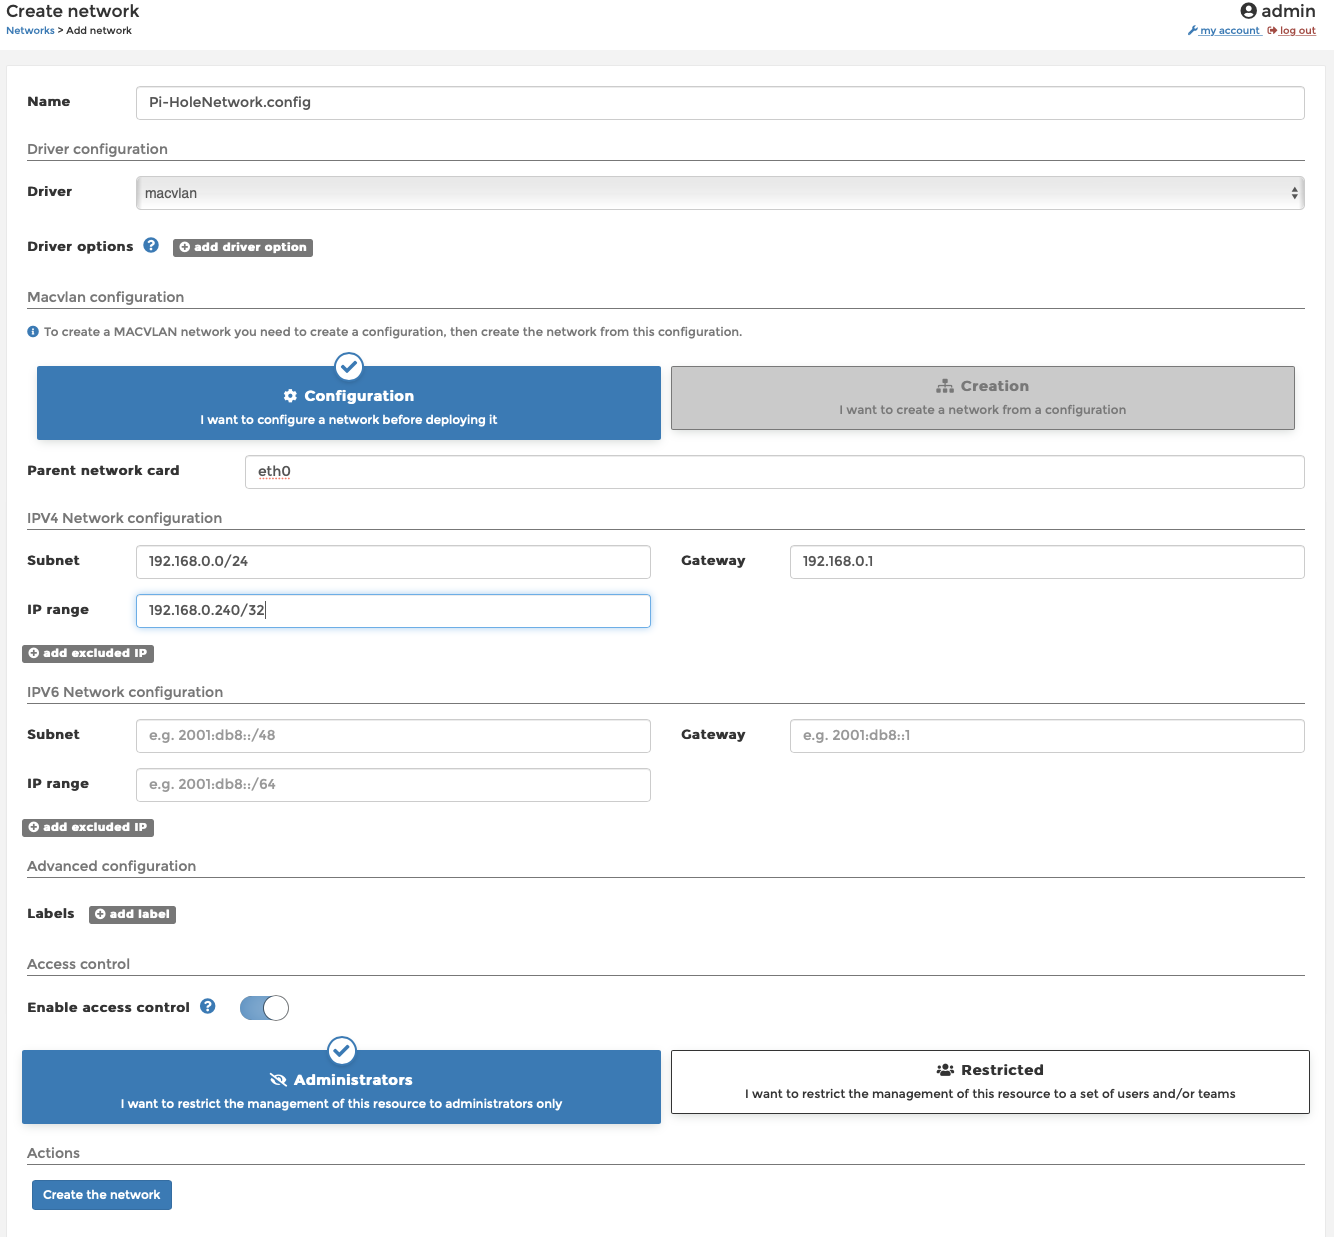
Then click ‘Add’
Now we’re going to add ANOTHER network based on the config we just created- click ‘Add Network’
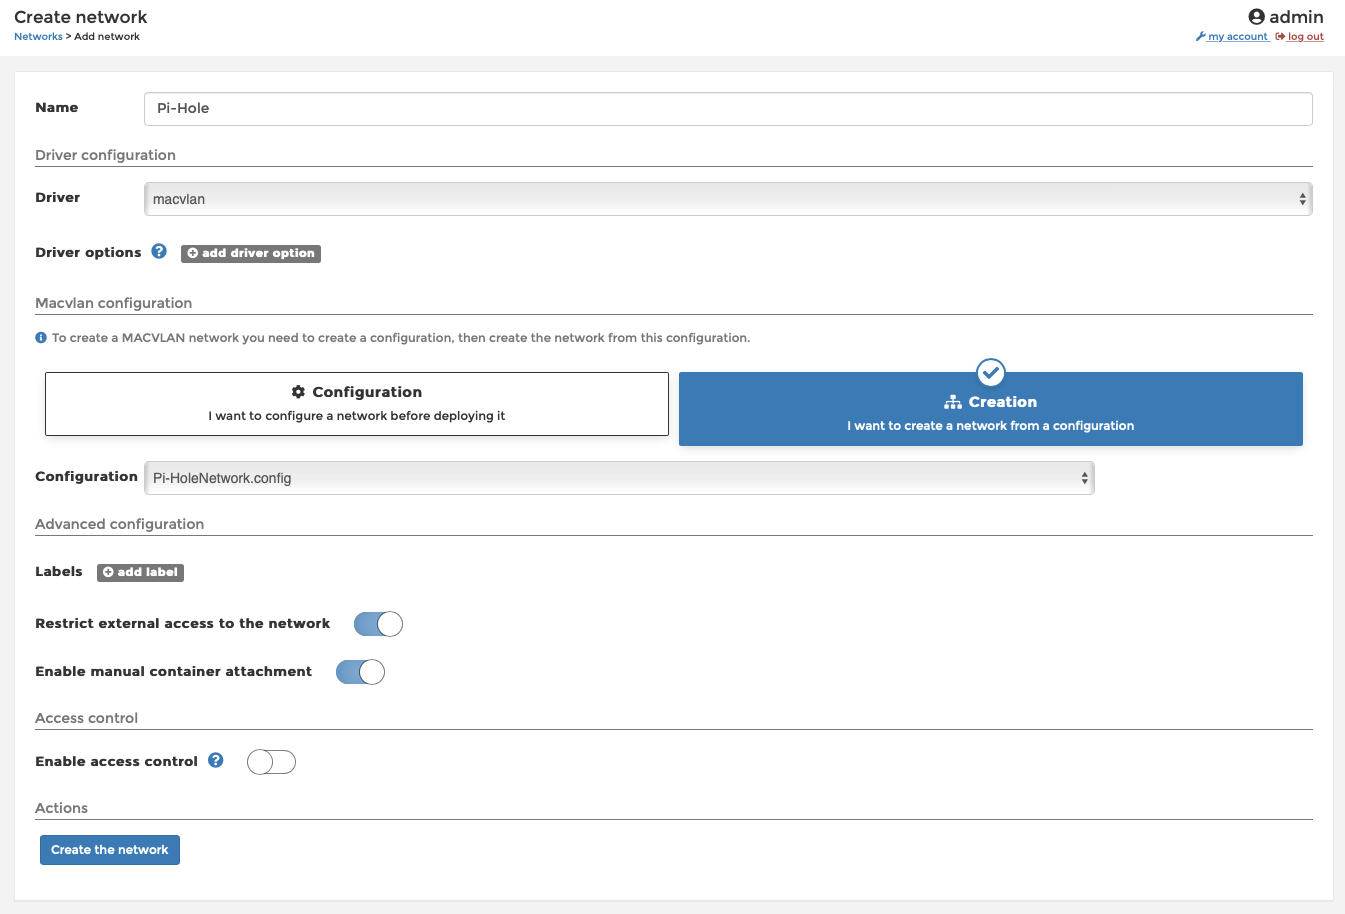
Add a network name and under ‘Driver‘ select ‘macvlan‘ again, this time you will see ‘Creation‘ as a valid option
Under ‘Configuration‘ select the config you created in the previous step.
IMPORTANT- you must also select ‘Enable manual container attachment‘ so we can connect the Pi-Hole to this new network.
I also set ‘Restrict external access’ to ‘on‘ because I’m paranoid, but set ‘Access control’ to ‘off‘ because I feel it’s adequately protected and I’m not THAT paranoid.
Create your Pi-Hole
This can be done from inside the Synology Docker interface or inside Portainers interface, but let’s stick with Portainer for now.
Still in the Portainer portal, go to ‘Containers‘ on the left hand side, then ‘Add Container‘
Add a name, set the image to be downloaded from Docker.io/pihole/pihole:latest
select ‘Always pull the image‘ for freshness, and set up the 4 port mappings as follows, then turn ‘Enable access control‘ to ‘off‘
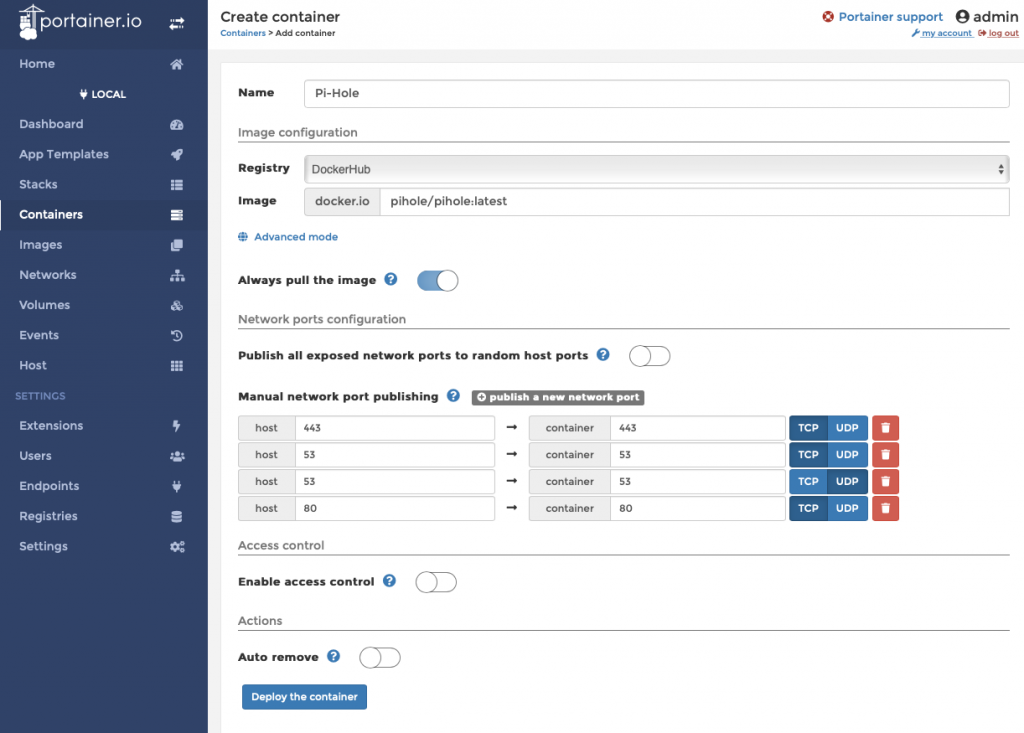
Don’t hit deploy yet!
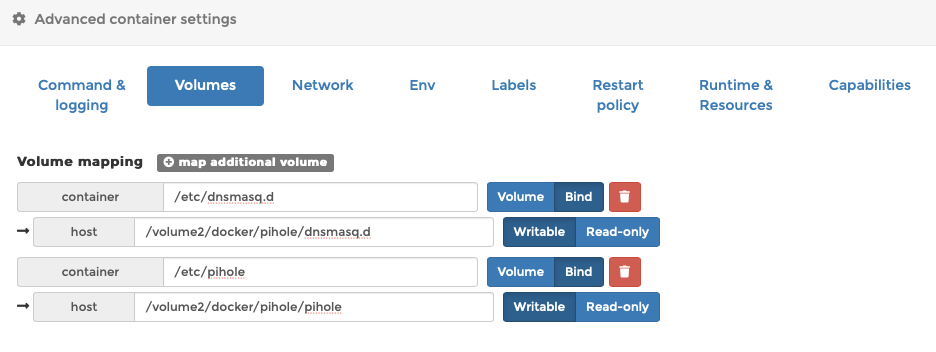
Down the bottom of this page under ‘Volumes‘, click ‘map additional volume‘
/etc/dnsmasq.d    To bind to     /volume1/docker/pihole/dnsmasq.d
And another bind for /etc/pihole  To     /volume1/docker/pihole/pihole
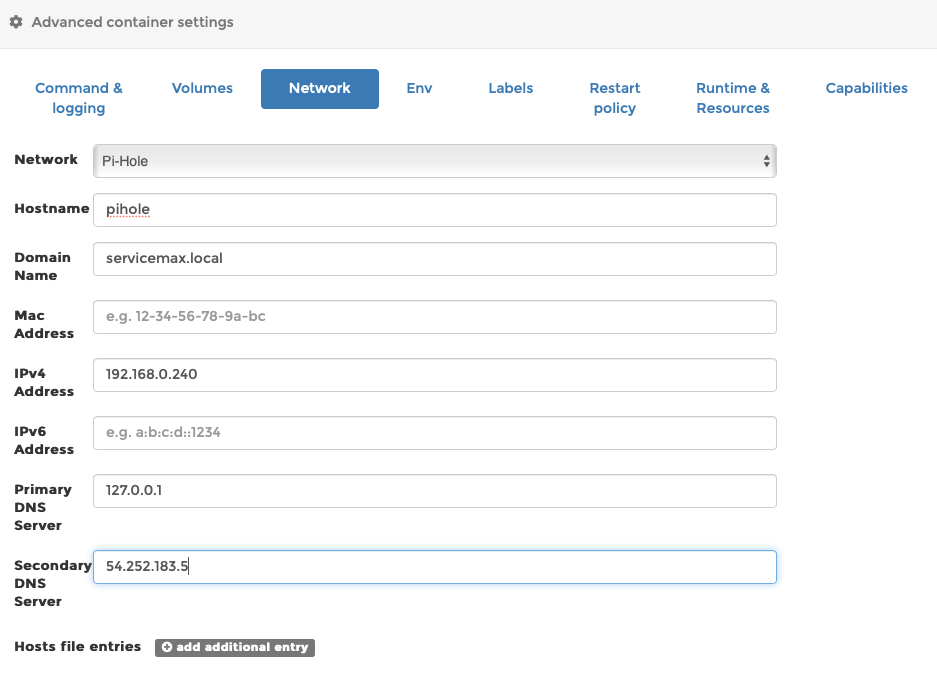
Under the ‘Network‘ tab, select your PiHole mavlan network (not the config network)
add a hostname and domain name. You can probably skip MAC address, add your chosen IP address. The Primary DNS must be the localhost so put in 127.0.0.1, and I’m using Getflix so I’ll make the Secondary DNS 54.252.183.5 but this probably won’t work for you
Add environment variables- go to ‘Env‘ tab and click to add these- that’s 2 DNS servers separated by a ; semicolon
You can also set the port but see the docs for details. Thanks to reader Andrew Eberlein who contacted me about this!
TZ    Australia/Sydney
PIHOLE_DNS_  54.252.183.5;54.252.183.4

Go to ‘Restart policy’ tab and set to ‘unless stopped’
Another warning- on Portainer and Synology, upgrading and recreating your container may cause the controller to cache some ENV variables, and the container will fail to start. This happened to me, and deleting these 6 ENV variables fixed the issue- https://discourse.pi-hole.net/t/pihole-portainer-docker-5-8-1-startup-error/48722/6
This is also likely to happen if you use something like Watchtower to upgrade your containers. we get warned to NOT use these tools all the time in case they break stuff, but breaking stuff is why we’re here, right?
Now go back up the page and click ‘Deploy the Container’
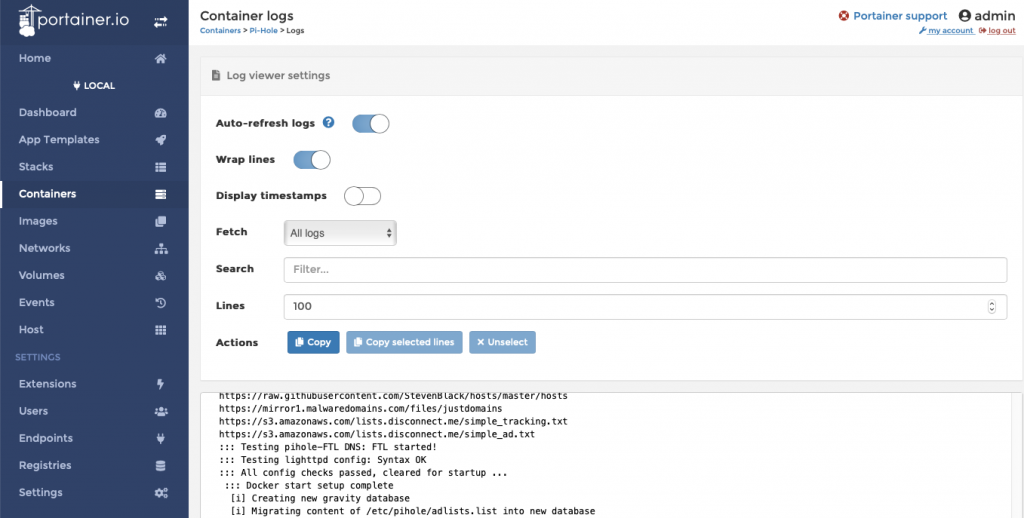
– if you’ve done everything right you’ll get a success message, and you can retrieve the password by clicking on the log icon in the ‘Containers’ tab. It’s better to allow the Pi-Hole to set a random password than setting one yourself, but you can do this in the variables settings if you want.
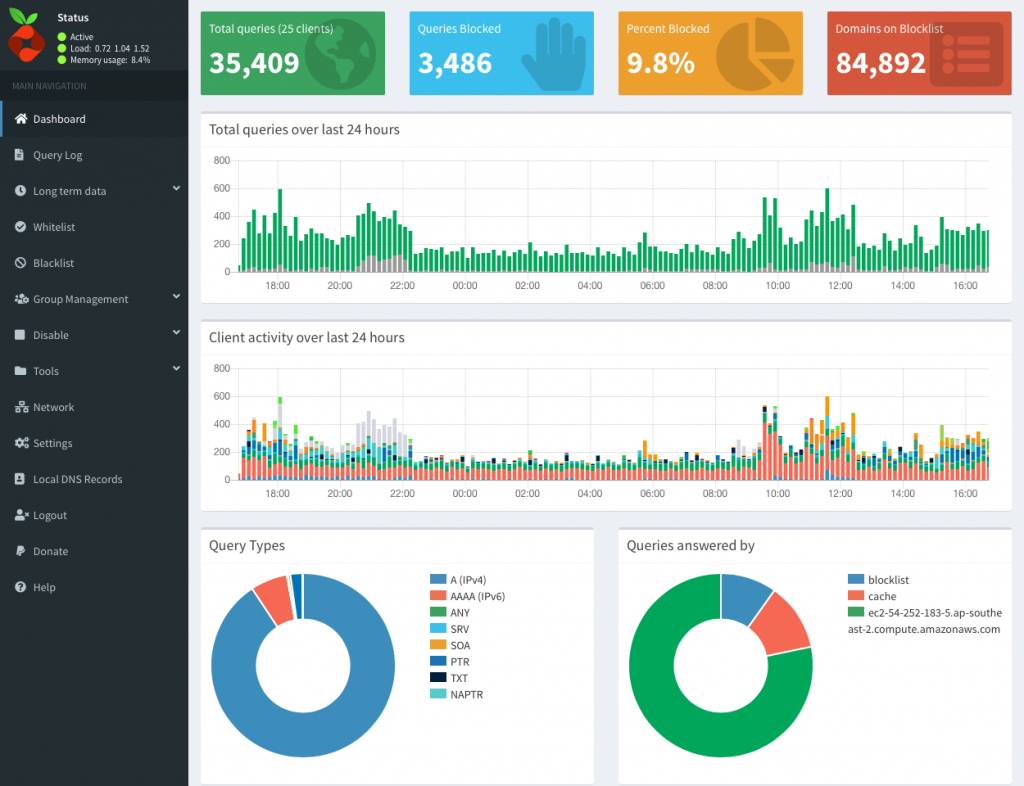
Now go to the IP address that you chose for your Pi-Hole way back when you set up the macvlan network, click the link to go to the Admin page, put your password in and BINGO!
You’ve just set up Portainer and Pi-Hole in docker on Synology NAS!
Your last task is to go back to your router and set it to give out the new Pi-Hole address when giving out DHCP leases
PLEASE READ– I’ve had a number of people write in who are confused about this statement. It does NOT mean that you need to set up your Pi-Hole as the DHCP Server. You can use your existing DHCP Server, but instead of giving out the routers address for DNS resolution, you tell it to give out your Pi-Hole’s IP address as the DNS Server.
Keep your DHCP Server, but change the DNS address that it gives to clients…
Or put another way- log into your existing router. Go to the DHCP setup. Find the DNS settings in there- and change those numbers to your new Pi-Hole IP address
Upgrading Pi-Hole
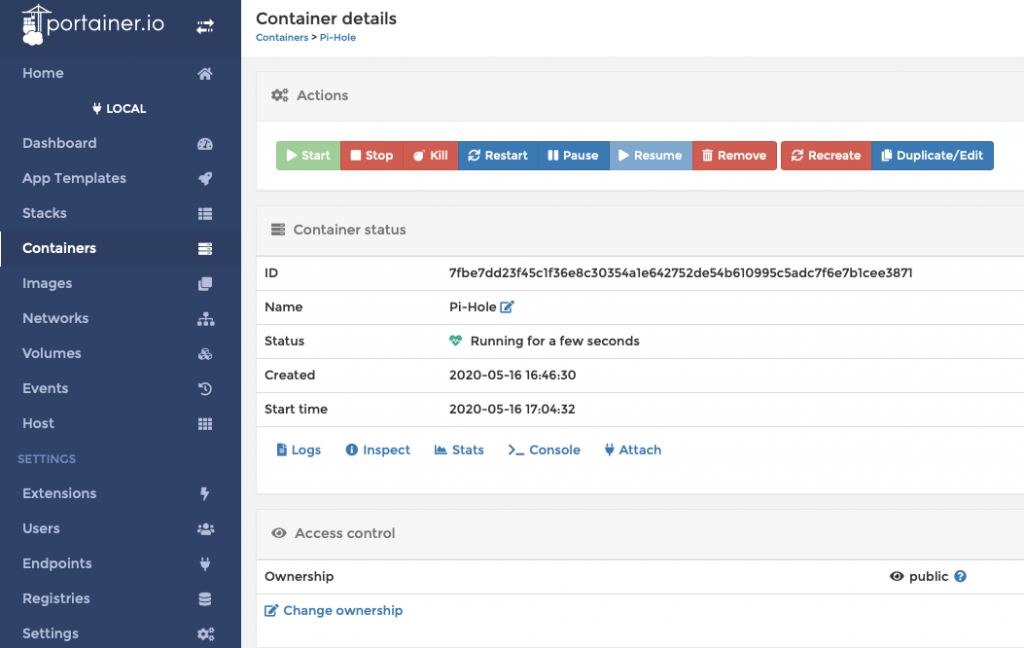
Upgrading is stupid simple- go to Portainer/ Containers, click on the name of your container to go to the admin screen, stop your Pi-Hole, click ‘Recreate’ and make sure you tell it to download a new copy with the switch that says ‘Pull latest image’. Wait a few moments for it to finish, start your container again, and take a moment to give thanks for all the toys. You’re done!
Upgrading Portainer
After this article came out, Portainer went from v1.24 to v2.0. I have used this install guide for 2 internal servers so I upgraded 1 of them to Portainer v2.0 and it comprehensively barfed.
took me ages to get back to this and figure out the easiest way to upgrade, so here it is-
- Shut down Portainer in your Synology Docker interface or via CLI
- Delete the Portainer container from within the Synology Docker GUI
- Go to the Docker Registry and search for ‘Portainer-ce’ and download the latest image
- SSH into your Synology NAS ( ssh [email protected] < fill in your own stuff here)
- Make yourself root by executing ‘sudo su -‘
- Execute the same command you used to build the container in the first place, except with -ce on the end of the Portainer description
Your new command will look like this-
docker run -d -p 8000:8000 -p 9000:9000 --name=portainer --restart=always -v /var/run/docker.sock:/var/run/docker.sock -v /volume1/docker/Portainer:/data portainer/portainer-ce
Warning- at least once I got an error message saying the old Portainer still existed and therefor conflicted. You can just YOLO and delete it if you get this message, but check that it hasn’t actually done what you asked and launched Portainer 2.0 while still complaining- it did this to me once too..
Problems With Communication Between Docker Containers?
I was contacted by a reader who wishes to remain anonymous, who said that his Docker containers could not access the Pi-Hole, and neither could his NAS. If you’re having this issue, he was also kind enough to write up the solution (thank you!)
I’m pasting it here as sent because I don’t currently have time to go through and verify it, I’ll come back later to see if I can make it clearer, or if I find out it kicks your dog or something…
Thank You & Sources
I owe a huge debt of gratitude to those whose previous work I have leveraged to get this done-
Thanks to –
Jeremy at NASHosted for this article-
https://nashosted.com/setup-and-install-portainer-on-synology-nas/
Dustin at Home Network Guy for
https://homenetworkguy.com/how-to/install-pihole-on-raspberry-pi-with-docker-and-portainer/
And the folks at Portainer for
https://www.portainer.io/installation/
https://www.portainer.io/2018/09/using-macvlan-portainer-io/
One last note- We could make this tutorial a LOT simpler if we could execute the socks linking command in Synology’s Docker implementation- there’s only one part of the SSH command that needs to be executed via SSH right now and if we could overcome that we could avoid having to use SSH…
I’ll keep working on it…